Pages

Tuesday, April 30, 2024

Register for May's Online Stamp Class

In this post you will find all the information you need to register for my May stamp class. I call my class Technique Time! and if you love to make pretty things this is a class just for you.

May's stamp class will feature the Frames and Flowers Specialty Designer Series Paper from the Annual Catalog. You can see these beautiful papers on page 29 or visit my Online Shop. 

For this class you bring the stamps, dies, masks, and inks and I'll provide everything else in a kit that I'll mail directly to you. Also make note that for those outside of the US an online version is available.


There are two options to choose from: a fully packed kit shipped to your door OR online access to a PDF. Register while supplies last as class kits will be limited.

This online class will be recorded for replay. 

We'll be creating five projects; two clean and simple cards and three artfully avid style projects. These will include great layers, detailed focal elements, clever cuts, stamped inside designs, and folds along with finishing touches that every paper crafter loves.

Class kits will include a full pack of Frames and Flowers Specialty DSP, precut and scored cardstock card bases; a variety of Stampin' Up! ribbons and embellishments; and precut cardstock pieces to complete each project. 

Registration open from now to 5/17 or until kits are sold out.

All kits will be mailed 5/18.

Use the button below to reserve your spot.

Option 1 - Full Kit $35 (available in the US only) SOLD OUT
  • Fully loaded class kit packet
  • Access to the FB Live class/replay on 5/23
  • Invitation to the 5/24 Zoom gathering/class
  • Membership to SeeingINKspots Backstage Pass
    • video recordings of this class & many more past classes
    • full array of photos for this class & many more past classes
  • First class shipping, kits ship 5/18
Option 2 - Online Access $16
  • A PDF of the cutting measurements for the three projects
  • Access to the FB Live class/replay on 5/23
  • Invitation to the 5/24 Zoom gathering/class
  • Six-month membership to SeeingINKspots Backstage Pass
    • video recording of this class & many more past classes
    • full array of photos for this class & many more past classes
Use the button below to register for class:

Frames & Flowers Technique Time! Stamp Class

Artisan Post #8 - Cake Fancy


This post includes the photos and steps for the project I created for my first Tuesday Tip of the 2024 Artisan year. I used the Cake Fancy Stamp Set and Stampin' Blends along with the Thoughtful Moments Hybrid Embossing Folder Die.


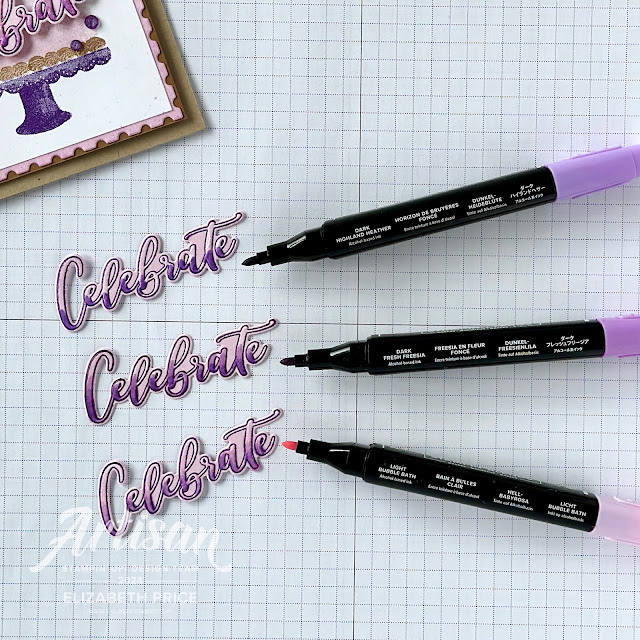
TIP: Create seamless ombre effects and custom colored Linen Thread with Stampin’ Blends.


Step 1. Select three to four Stampin’ Blends to create a perfectly blended ombre of color. First, with the darkest color gently touch the bullet tip to the bottom of each letter. Second, with the medium color draw the blend over the first color and pull/blend the two colors upward. Repeat with the lightest color drawing further up each letter and allow the colors to blend.


Step 2. Use a Wink of Stella Glitter Brush to finish the the smooth blend of color. Paint with upward stokes in the same direction of the ombre.


Step 3. Tack down the end of Linen Thread then color with the brush marker end of a Stampin’ Blend.


Sunday, April 21, 2024

Filled with Fun for Monday Montage


I have some sweet stampin' to share with you. I made this cute spring themed happiness card using the Filled with Fun Bundle. These stamps and dies are a part of the Online Exclusives offer by Stampin' Up!.


I selected my color palette from the stripes of the panel of Delightfully Eclectic DSP. The wagon is Fresh Freesia, the balloons are Crushed Curry, stamped off/second generation, the flower stems and leaves are Old Olive, the card base is Bubble Bath, and all the other images are Night of Navy.


Are you in the mood for more stampin'spiration? Well good, because next in our hop is Emily. She has some good ol' paper crafting fun for you.


Saturday, April 20, 2024

Artisan Post #7 - Comforting Thoughts


There are four Groups in this year's Artisan Design Team. I am in Group Three along with four others. Our projects most typically post on the third Friday of each month. For April our assignment was to create two cards that would feature the Comforting Thoughts Stamp Set and the Dazzling Droplets Stamp. Both stamp sets are part of the Stampin' Up! Online Exclusives.


The wreath pieces that encircle the Comforting Thoughts greetings are from the Lifetime of Love Dies. I used Blackberry Bliss, Moody Mauve, Bubble Bath, Basic White, and hand-painted Fluid 100 Watercolor Paper. I created a wash of color using all the same colors on the Watercolor Paper to die cut all the flowers.


I combined two of the Comforting Thoughts greetings to give the salutation more impact. I stamped both with Blackberry Bliss and offset them to best fill the inside of the wreath.

In a style true to me, I finished this card with Wink of Stella splatters, Iridescent Foil Gems, and colored Linen Thread. I used a Berry Burst Stampin' Blend to create a custom color Linen Thread. It's such and easy way to make the thread match your projects--try it.


For my second card I used the Lifetime of Love stamps to highlight the Comforting Thoughts greetings. What's fun for this card is the background. I stamped and heat embossed the Drizzling Droplets background stamp on Fluid 100 Watercolor Paper. Then I painted a wash of Bubble Bath, Berry Burst, and Blackberry Bliss over all the embossed "droplets." With each color I painted less and less so there would be a variety of color levels.


I used one image for the three greetings on this card. For each saying I masked off the other two with tape and stamped them. then I die cut each with a rectangle from the Stylish Shapes Dies. The flower images and die cuts all come from the Lifetime of Love Bundle. For these flowers I used Stampin' Blends to color them. I wish you could see the beauty of these in real life they are striking.


Friday, April 19, 2024

#TGIF469 Is About Butterflies


#TGIF469 is all about butterflies. We are using the inspiration graphic below for this week's challenge. Maybe the butterfly color inspire you or maybe you have some butterfly stamps and dies. I don't have any! But I do have the Sweet Thoughts Memories and More Card Pack and the coordinating Sweet Thoughts Memories and More Cards and Envelopes. 

For my card I used the two Sweet Thoughts products and the Everyday Essentials Dies. I die cut a rectangle and a circle from one of the cards from the pack to layer behind the big butterfly. The big butterfly is a die cut cardstock sticker. I used an Embossing Buddy to remove the stickiness and then used Mini Stampin' Dimensionals to attach the body/center of the butterfly to the card. I bent the wings upward to give them the look of being in flight. 


Thursday, April 18, 2024

Stamp, Cut Apart, Rearrange, Mount


I enjoy creating cards that include a simple technique that I call "stamp, cut apart, then rearrange;" it's just that easy. For this card I mounted my floral elements on a panel of embossed Basic White Cardstock with Stampin' Dimensionals. I stamped with the Enduring Beauty Hybrid Bundle along with Blackberry Bliss, Petunia Pop, and Old Olive Ink Pads.


Sunday, April 7, 2024

Nature's Sweetness Suite is Sweet


I love the Nature's Sweetness Suite Collection! I designed this fancy trim-fold card for my Technique Time! Stamp Class last month. The colors are a fantastic mix of neutrals with subtle inviting tones. I mixed Pecan Pie and Pebbled Path with Fresh Freesia, Pool Party, and Lost Lagoon.


The Suite includes two stamp and die bundles along with specialty dip, Adhesive Backed Cork Rounds, and Faux Leather Trim. The DSP is called Nature's Sweetness and the two bundles are called Notes of Nature and Lovely & Sweet. I have to say that the dies in both bundles are off the charts fabulous! And, the stamps combined from both bundles are perfect for stamping great focal points and collage style backgrounds.


Here's a look at what I call "second card." I like making cards that include multiple folds to allow for more  stampin' aka "second card." This second card features one of the pieces of Nature's Sweetness DSP.


The inside of the card includes some collage style stampin' to add a bit of decor inside to balance with all the other stamped, die cut elements, and embellishments.


Well, that's what I have for this installment of Monday Montage! Thanks for stopping by. Next up is the fabulous Emily! Let's go take a look at what she has been up to.


The Wow of Heat Embossing


Being the first Sunday of April it's time for a Creation Station Blog Hop. This month our theme is heat embossing, a stampin' technique adored by most paper crafters. For these cards I pulled out both white and black embossing powders to create some cute Little Dreamers baby cards.


I started this Congratulations card with a mix of heat embossing and watercoloring. I stamped the Drizzling Droplets background stamp on a piece of Fluid 100 Watercolor Paper and heat embossed it with white embossing powder. Once the piece was cool I stamped the Drizzling Droplets again directly on top of the embossed image using a mix of Misty Moonlight and Boho Blue Ink Pads. Then I used a Water Painter to paint a wash all over. Try this technique it's super fun!


I did a bit more heat embossing for the greeting and the elephant. This time I used black EP. What's cool about watercoloring a heat embossed image is that the raised edges contain the water/ink/paint.


I did a bit more of the heat emboss resist technique for thus Big Love card. I started by stamping and embossing the stars on a piece of Fluid 100 Water Color Paper. I heat embossed the stars with white EP and then painted a watercolor wash of Smoky Slate and Misty Moonlight.


To enhance the stars I painted the inside of each star with plain water and immediately blotted the star dry. That process lifted some of the blue wash. Then I added Wink of Stella to each star. In real life this card is super adorable.


Stay tuned for more heat embossing ideas as you continue through our hop today. Next up is Rachel at Naptime is Stamptime. She always stamps up the best projects. Enjoy! Thanks for visiting.


Friday, April 5, 2024

A Paper Pumpkin Thing Blog Hop "Memorable Meadows"


Welcome, welcome, welcome to our Memorable Meadows A Paper Pumpkin Thing Blog Hop. I'm so happy you are here at my SeeingINKspots Blog today to check out a few of my alternative projects using this Kit. I like to call these alternatives "Up!STYLING" my Paper Pumpkin. 


This month's Kit was jam packed with awesomeness. For this first card I add a few die cuts. I die cut two leaves using the Love of Spring Dies, the dies that have been designed to coordinate with the Jan-Mar PP Kits. This four-piece die set has seen lots of use from me. I have loved all four shapes. I also die cut a Pecan Pie fence. The fence die is found in the Garden Meadows Dies, which are from the Meandering Meadows Suite Collection. The entire collection coordinates with this month's PP Kit. I truly love it with Stampin' Up! coordinates products.


The layer behind the greeting is one of the Gorgeous Grape vellum rectangles from the PP Kit. I think the steely grey purple is cool and a fun mix with the Gorgeous Grape Cardstock leaves and the purple vellum leaves.


This little goodie pouch is part box and part sour cream container. I made a box bottom and then wrapped it with a 5 1/2" x 6" piece of Meandering Meadows DSP. To top it all off I added a cluster of elements on top of one of the wooden elements from the PP Kit.


This is my favorite alternative. In real life this shimmers and shines with Wink of Stella and the colors are so happy and soothing.


I have to say a big "thank you" for stopping by today. We'll be back next month with more alternative Paper Pumpkin projects. For now, be sure to hop on over to our next stamper.