Pages

Friday, January 26, 2024

#TGIF457 Love You


Join along in a "lovely" card challenge at #TGIF457. Take a look at the graphic below and whatever inspires you go a paper craft it. I took to the blend of pink and red hues and created a Valentine. It's a Valentine that could be for anyone at anytime.


I started by blending Bubble Bath, Flirty Flamingo, and Melon Mambo on a piece of Basic White Cardstock. I splattered those same colors all over and then cut strips to fit the front of m Coastal Cabana card base. I used dies from the Hooray for Surprises set and made the "love you" with the Thoughtful Moments Hybrid Embossing Folder.


Artisan Post #2 - Hooray for Surprises


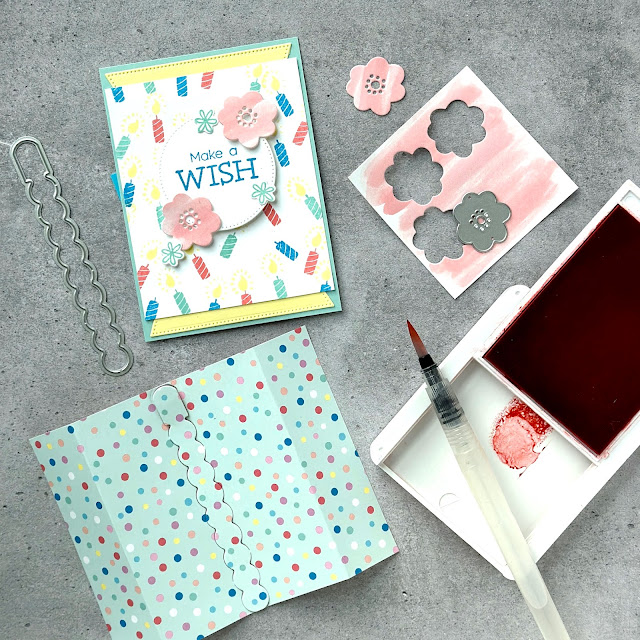
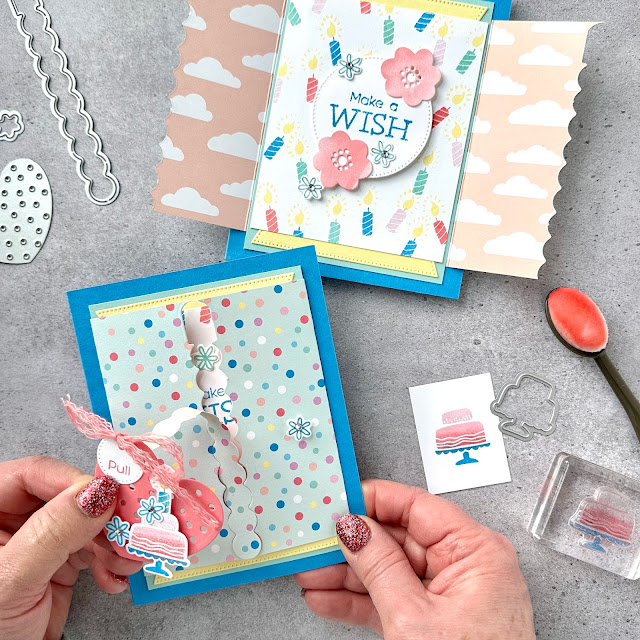
Here's a look at one of my creative projects that I designed for Stampin' Up!'s social media. These interactive cards were created with the Hooray For Surprises Bundle. Hand stamped messages are hidden under the perforated die cuts.


As part of the social media post we have to photograph all of the supplies used for our creative projects. For me, it's the most difficult picture to take. The set up often takes me a LONG time. So, here you have it the photo of supplies for these three cards.


As part of the creative project posts we include tips and techniques to complete our cards. The following photos are my tips for assembling these three interactive cards.

Perfectly align stamped images behind the perforated Hooray for Surprises Dies. Step one, make a “positioner” from a piece of Grid Paper. Cut the Grid Paper the same size as the layer that will be stamped (white) and the cover layer (DSP) that will have the perforated die cut. Step two, die cut the Grid Paper, remove the perforated section, place directly over the white layer, and then stamp inside the open area. Use the same Grid Paper as a guide for die cutting. Line up the Grid Paper over the DSP and insert the die into the opening and die cut. Step three, place the DSP directly over the stamped layer and add to your card.


Think about adding the interactive element to the inside of a card. Perfectly place your stamped hidden message by making another “positioner” with Grid Paper, the perforated heart shape die from Hooray for Surprises, and a circle from Stylish Shapes Dies.


Use the elongated perforated die to make a fun interactive card opening. Design and stamp the hidden message and decor then wrap with a layer of DSP. Before you adhere the wrapped layer be sure to die cut the long perforated die down the center. 


Here’s a look at the birthday card and how it opens, along with what is hidden inside.


Sunday, January 21, 2024

You Make My Heart Buzz


Welcome to Monday Montage! Today we are hopping and sharing some of our latest hand stamped creations. I'm giving you a look at my gate fold pop up Bee My Valentine card. In the picture above the top card is the front and the bottom card gives you a look at the back of my "you make my heart buzz" Valentine.


I used a piece of Thick Basic White Cardstock to base my card. To make it all fancy and fun I added pieces of the Bee Mine DSP. I took a cue from the colors of the DSP for my stamped bits. My favorite part of the card is the bee. For the body I used Daffodil Delight. First, inked up the image and stamped off then I did the rock and roll around the edges technique to add the two tones. Before stamping I used a Small Blending Brush to soften the lines of the rock and rolled edges.  


Here's a look at the back side of the card.


It's been a pleasure to have you stopping by for a quick minute. Next in our hop today is Emily. Click on over to see what crafty things she has be creating lately.


Saturday, January 20, 2024

Artisan Post #1 - Sending Love


This month my assignment for 2024 Artisan Design Team was to create projects using the #sendinglovebudle! There are five of us in our group and we each have our own style which means there are many possibilities with these stamps and dies. I created two cards that are both custom sized to fit my designs.


This first card measures 3 3/4" x 6" and is based on Lemon Lolly. Both pieces of DSP come from the Lighter Than Air pack and the Lemon Lolly twine is from the Baker's Twine Combo Pack. The Sending Love Bundle, the DSP, and the twine are new products found in the Jan-April Mini Catalog.

I used Pebbled Path ink for all of the stamping for this card. I thought it was a nice change of pace from using black. I used Lemon Lolly, Daffodil Delight, Petal Pink, Lemon-Lime Twist, and Gray Granite Stampin' Blends to color the mailbox. I cut the grass and bushes from Pool Party and Lemon-Lime Twist Cardstocks using the Sending Love Dies.


My colors for all the die cut mini envelopes include Fresh Freesia, Bubble Bath, Flirty Flamingo, and Petal Pink. They are layered on a printed paper from the Lighter Than Air pack of DSP which measures 5 7/8" x  3". Under the DSP is a layer of Flirty Flamingo and everything is adhered to a Thick Basic White card base. The finished size is 6 1/2" x 4 1/4".


Friday, January 12, 2024

#TGIF455 Bee My Valentine


Our latest challenge over at #TGIF455 is all about the sketch you can see in the graphic below. I got a tad bit carried away and kind of buried the sketch with hearts and flowers, but if you look close you can see how I was inspired by the layout.


I used a mix of Stampin' Up! products that include the Be My Valentine Bundle, the Sentimental Park Dies, and the Delightfully Eclectic DSP.  The card base is fully covered with the heart pattern paper. There are a few pink hearts scattered amongst all the white hearts in the paper. It's the pink hearts that steered me towards my color palette of Pretty Peacock, Lost Lagoon, Basic White, and Bubble Bath.


I cut down a long piece of Bubble Bath ribbon from the 3/8" Sheer Ribbon Combo Pack to tie a double loop bow. It's secured behind the bee to mimic the fluttering wings. I finished with Iridescent Gems and splatters of Wink of Stella.


Sunday, January 7, 2024

You're As Sweet As Honey


Welcome to our Monday Montage Blog Hop. For this hop I'm sharing my latest hand made card. 


I've been using up stamp leftovers in the past couple days. Yesterday I created this card with scraps I had stamped with the Fluffiest Friends Stamp Set and a bit more. To complete the card I had to die cut the branches, grass, and leaves from the Fluffiest Friends Dies. To give the die cuts more visual interest I colored them with Stampin' Blends. I really love the finished look of the bee hive.


Keep on hoppin' and head over to Emily's blog.


Creation Station is Going Fuzzy and or Furry


Happy New Year and may your 2024 be filled with stamps, ink, paper, and love. Being that this is the first Sunday of the month, the Creation Station Design Team is designing to this month's creative fuzzy and/or fury challenge. It's a fun filled theme that is wide open for all kinds of ideas. 
 

I have made a couple cards with a mix of Stampin' Up! products, but mostly feature the cute critters from the Fluffiest Friends Stamp Set and matching Dies.


The big bear image from Fluffiest Friends is my favorite To set the scene for this card  I used pieces of paper from the Lighter Than Air DSP pack. I think the sentiment from the Bee My Valentine Stamp Set is a perfect pairing with the honey loving bear. 


I pulled a birthday greeting from the Hooray for Surprises Stamp Set for this second card. I love the little gifts that each of these furry and fuzzy friends bring to the party.


For both cards I used the Baker's Twine Three Color Pack and the Rainbow Adhesive Backed Dots which are both products from the Lighter Than Air Suite Collection. For the balloon strings I deconstructed the blue twine from the Three Color Pack.


Have you been inspired to create a hand stamped project featuring our theme for this month? Review your stamp stash and make something fuzzy or fury. For now, click on over to the adorable Rachel Traudt at Naptime is Stamptime. She stamps fabulous cards and always makes me want to ink up my stamps.


Friday, January 5, 2024

A Paper Pumpkin Thing Blog Hop "All the Best"


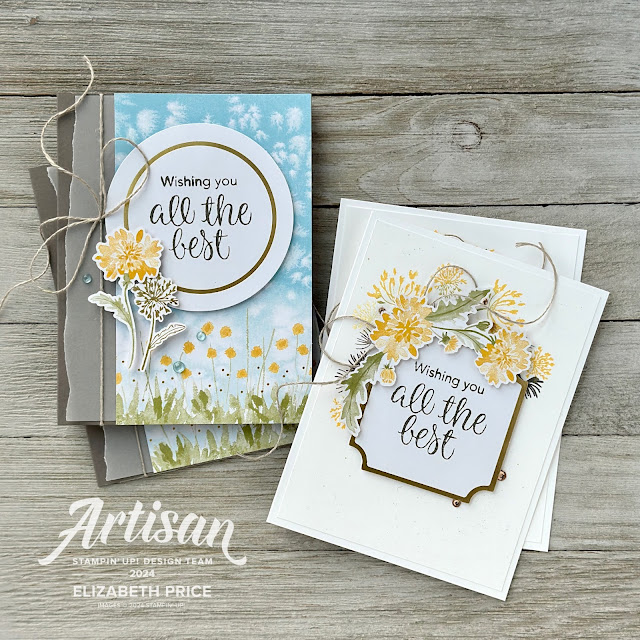
Have you seen the All the Best Paper Pumpkin Kit from December? It is SO fabulous! All the bits and pieces are gorgeous, the card bases are fantastic, the stamp set is top notch, and the faceted gems are beautiful!! Seriously, this kit is AWESOME!


For this post I'm sharing a couple cards that I created with some leftover pieces from the kit and some cardstock scraps on my stamp desk.  For this first card I used a 5 1/2" x 11" Pebbled Path card base that I was going to use for a project and then changed my mind. It was already scored at 4 1/4" x 8 1/2" along the long edge so, I designed this bi-fold card around those existing scorelines.

For the card front I had a leftover printed card front from the Kit. I cut 1" off the edge and saved that for the inside. I tucked a piece of Vellum Cardstock on the left side and then tied a big shoestring bow with Linen Thread to solidify the vertical elements on my card front.


Here's a look at the card with the card front in the open position. The right side opens as well and the very inside includes a 4" x 51/4" Basic White panel and the 1" strip that I cut from the front.


I wanted to create a card that featured a bit more stampin' and more of the images from the Kit's stamp set. My ink colors include Daffodil Delight, Mossy Meadow, and Pebbled Path. To know where to stamp all the dandelions I first used a pencil to lightly trace the label. Once I was finished stamping I erased the pencil lines and then adhered the label.


For this card I based everything on Thick Basic White and then included some Champagne Rhinestones and Linen Thread.


Thanks for spending a few minutes with me today. There are more alternative projects to see so, click on the next blog and continue being inspired.