Pages

Thursday, April 29, 2021

A Paper Pumpkin Thing is So Cool


Are you interested in alternative Paper Pumpkin projects?  If you answered yes, you are in the right place.  You have landed here today just in time for our "A Paper Pumpkin Thing" Blog Hop. Everything you see in this hop will feature items crafted with April's So Cool Kit.


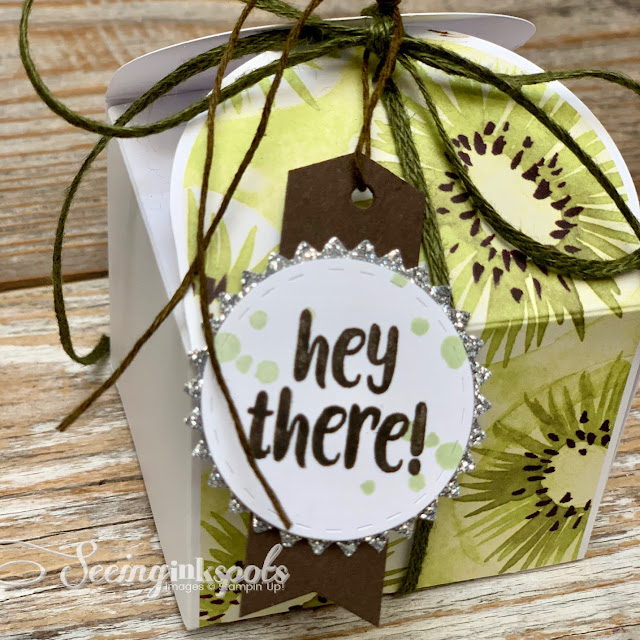
I'm always a sucker for a clever-cute box for packaging a little trinket or goodie.  So, what I had envisioned for this project came to life as this stylish kiwi themed square box.  I used two of the kiwi popsicle cards from the kit which I wrapped around a Basic White hand made box bottom to bring my vision to life.


Here's what I did:
  • I cut one 3 3/4" square piece of Basic White Cardstock and two 2 1/4" x 1" strips of Basic White Cardstock.
  • I scored the 3 3/4" square piece at 1/2" on all four sides, clipped out the four corners, and folded upward on all the scorelines.
  • I scored both of the 1" strips right down the middle of each at 1/2".
  • I trimmed off all the sticks from both of the popsicle cards.
  • I scored across both of the popsicle cards at 2 1/4" from the bottom edge, clipped along the fold of the card from the top to the added scoreline, and then folded the tops inward.
  • I used Stampin' Seal+ to add the 1" folded strips to each of the popsicles to allow me to attach the two cards to form the four sides of the box.
  • I used more Stampin' Seal+ on the folded up tabs of the box bottom and inserted it into the popsicles.
  • I wrapped Mossy Meadow Braided Trim around the box and tied a bow.
  • I stamped a tag with the stamps from the kit and layered it on one of the silver glimmer die cuts from the kit and then layered it on a strip of Early Espresso Cardstock.
  • I tied the tag to the box with a piece of the twine from the kit.  Before I ran the twine through the tag I colored it with a Soft Suede Stampin' Blend.

Here's a side view where you can see how roomy this little box is.


If you would like to see my Up!STYLE Facebook Live video class where I'll be sharing a stack of projects featuring the So Cool Kit join me next week.  I'll be on my Seeinginkspots Page on Thursday, May 6th at 10:00 a.m. PST.  It's going to be a blast.

link to class reminder


Be sure to click on all the names below to see lots more inspiration.


Sunday, April 25, 2021

A Friendly Flamingo for Monday Montage


Hello stampin' friends and let me just say "it's fantastic to have you following along our Monday Montage Bog Hop."  I'm sharing a fancy folded Friendly Flamingos card which I designed to perfectly fit the Stitched Nesting Dies (retiring).


I had my eye on the Fine Art Floral Designer Series Paper to combine with the flamingo stamps and dies.  I thought the non floral patterns and colors of this paper felt very Miami and Golden Girls, which was just what I wanted to help inspire some unique cards.  This card here is one of a series that I created for my April Technique Time! Stamp Class.


The card base is made up of three pieces of Flirty Flamingo Cardstock.  One measures 11" x 5 1/2" and the other two pieces are 2 1/8" x 5 1/2".


To tie the card closed I used the Blushing Bride 3/8" Metallic Ribbon.  I included a small Stitched Nesting Die on the back as a "ribbon carrier" and then carefully adhered the from Stitched Nesting Label so the ribbon would slip through when the card is fully open.


Here's a look at the inside and how the fancy folds frame the largest of all the Stitched Nesting Dies.


Thanks for stopping by and checking out what I have been stamping lately.  Enjoy hopping with us all.

to Julie


to Cheryl


Friday, April 23, 2021

Dog or Cat? #TGIF313

For this week's challenge at #TGIF313 you get to pick dog or cat.  Or, you could even do both dog and cat.  For me it's going to be dog.  I am 100% a dog person.  I love dogs big and small.  I especially love miniature schnauzers.


Most of the look of this card comes from the Playful Pets Designer Series Paper.  The black and white text design as well as the friendly grey pooch are from two of the prints in that pack.  I fussy cut to dog and layered it with a die cut Calypso Coral heart and swoops of white twine.  The only bit of stamping for this card is the "sending lots of."  That came from the Pretty Perennials Stamp Set.  Then the word "happy" was cut using the Word Wishes Dies.  Pretty cute card don't you think?


Sunday, April 11, 2021

This Simply Succulent or That Simply Succulent


Happy Monday everybody!  For this Blog Hop I decided to give you a look at something from my latest class.  My class each month most often includes three cards, however sometimes I'll share a 3D project.  I did something a bit out of the ordinary with one of the three projects from my Simply Succulents Bundle Focus Class.  For one of the projects in this class I included the supplies to make either a card or a faux dream catcher.


I all started with a 3" vintage wooden embroidery hoop.  I had stacks of them and wanted to see them be used in a clever way.  I had visions of making some sort of dream catcher with the succulents, but wasn't sure how it was going to all come together.  When I used the Potted Succulents large background die in lieu of tying a web with thread I instantly fell in love with the look.  I even patted myself on the back ;0)


Since this was a class to feature the Simply Succulents Bundle and I do all the die cutting for my kits I couldn't get too carried away with an intricate array of stamped and die cut pieces.  Once I had it all designed I decided to offer the option to take these exact pieces and supplies to make a card for those who didn't want to make the dream catcher.  All I added to each kit was a half sheet of Crumb Cake Cardstock.


After teaching each of my classes I ended up with several of these dream catchers.  My plan is to package a bottle of pink lemonade in a tall cellophane bag and tie a dream catcher as a decorative "bow."  I know just the friends these pretty little thinking of you presents to.

Here's a look at the same supplies arranged on a card.  Those that chose to make the card had a few leftover pieces of ribbon.


Products Included
Stamps:  Simply Succulents Stamp Set
Dies:  Potted Succulents Dies
Ink:  Versamark Ink
Other:  White Embossing Powder
Papers:  Misty Moonlight, Magenta Madness, Just, Crumb Cake, and Basic White Cardstocks
Embellishments:  Mossy Meadow Braided Linen Trim, Just Jade, Misty Moonlight, and Magenta Madness 2020-2022 In Color Ribbon, 3/8" Fine Art Ribbon, and Opal Rounds

Thanks for stopping by for our Monday Montage Blog Hop.  Next along the hop is the most awesome Stamp Doc.  That' right Melissa Stout is going to share some more stampinpiration.


to Melissa


to Cheryl


Friday, April 9, 2021

TGIF is Goin' Slimline This Week

This is the challenge for you if you are big into slimline cards.  Over at #TGIF311 we are creating slim line cards.  Join us for the fun!  Slimline cards can be any dimensions that you choose, as long as they are "long and skinny."  There are a couple of common sizes that we have found and they are, when folded, a traditional slimline @ 3 1/2" x 8 1/2" which fits a standard business envelope and the mini slimline size  @ 3" x 6".


I worked with the same supplies for both of these slimline, 3 1/2" x 6 1/2", cards.  I inked up a brand new stamp set called Etched in Nature which will be available in the upcoming Stampin' Up! Annual Catalog coming this May.  I used Misty Moonlight, Cinnamon Cider, Night of Navy, and Early Esspresso Inks, matching cardstocks, Basic White cardstock, Printed Labels Dies, and the new upcoming prints of the In Color 6" x 6" DSP.


A few other supplies I used were the Gold Gilded Gems, Forever Gold Specialty Paper (retiring), and Linen Thread which I thinned out.


Tuesday, April 6, 2021

Sweetest Baby Bunny for Hand Stamped Sentiments


Our latest challenge at Hand Stamped Sentiments is a spring themed inspiration board.  From these photos in the board my eye gravitated to the bunny and bright small flowers.


I began with a half sheet of Petal Pink Cardstock scored to make a top fold.  Next, I stamped a panel of more Petal Pink Cardstock with the bunny image from the Wildly Happy Stamp Set with Petal Pink Ink.  I edged the left side of the panel with scraps of Playing With Patterns DSP.  For the focal point I layered a couple die cut pieces cut from the Painted Labels Set and the Well Written Dies.  I stamped the bunny image again with Night of Navy Ink on Basic White Cardstock.  I colored the ears and noses with Petal Pink Stampin' Blends and then added Wink of Stella to both.  To finish I included tiny flowers and a soft white floppy bow.


Sunday, April 4, 2021

Sweet Treat Packages for Creation Station


Happy Easter Sunday to all who stop by for today's Creation Station Blog Hop.  For this April's theme we were to design a Sweet Treat Package.  With all the fantastic products offered by Stampin' Up! this was an easy and fun challenge.


I had great plans to make a delicious little treat that would feature the Sweet Strawberry Bundle.  I could see bright red shining strawberries in a mini drink tote style goodie holder BUT then one of my Stampin' Besties sent me the cutest chick package for Easter I was then inspired to make a change to my plan.


I had to put my spin on a hand stamped paper crafted Easter chick.  I grabbed some Daffodil Delight cardstock and Mango Melody ink to make an adorable chick using the Sweet Strawberry Stamp Set, Strawberry Builder Punch, and the Snowman Builder Punch.


Here's a close up look at the chick tag.  The body is the strawberry stamped upside down.  The little wing was stamped with a portion of the stem image and so was the beak.  For the eyes I used the tip of a stylus and the feet are the stick arms from the Snowman Builder Punch.  

I love the stitching details that frame the two tags.  By the way these were cut with the Potted Succulents Dies.  For the Happy Easter detail I used the Word Wishes Dies.  The words were cut the yellowy end of the ombre Rainbow Glimmer Paper.


So, here is a top view.  You can really see the shape of the box from this angle.


And, here is a side view.


Are you interested in learning to make this little tote?  I've taught the easy measurements, cuts, and folds to make this mini drink style caddy treat box.  You can create along with me; just gather the following items:  one sheet of cardstock, one 6"x6" piece of DSP to match, a trimmer/scorer, and some adhesive.  Click this link and watch the video.

Coming up next in today's Creation Station Blog Hop is the powerstamper, amazing paper crafter, the one and only Yvonne Spikmans-Van Bruggen!!!  Pop over to the Creative Teacup and see what Sweet Treat Yvonne has designed to inspire us all.